
CONTENT EDITOR
Below you will see various applications in the Sitecore Experience Platform available for you to use. If at any time you would like to return to this dashboard, you can click the Sitecore home icon in the top left corner.
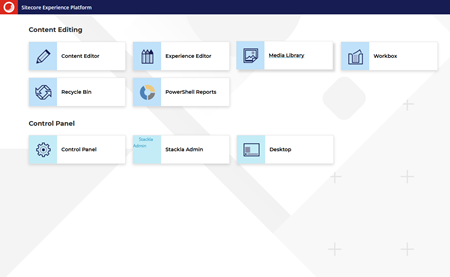
The Content Editor is an editor tool used to edit and manage all the content on the Northumbria University website.
The Experience Editor allows you to move, add or remove components beyond the provided webpage templates.
The Media Library is where media content such as images and documents are uploaded and maintained.
The Control Panel allows you to change your account information, including your password.
The Recycle Bin allows you to view or restore your deleted items.
*If you have forgotten your login details, please email bc.digital.marketing@northumbria.ac.uk and request an account reset.
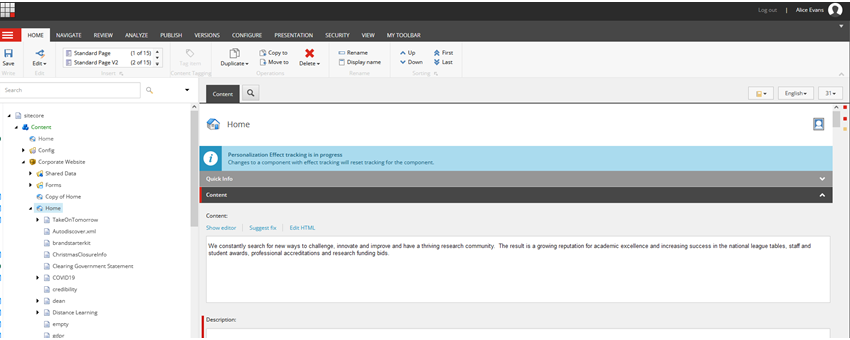
The Site Tree is located on the left hand side of the main Sitecore interface. If you would like to make this bigger, just drag the site tree column separator to the right.
There is a Search Bar at the top of the Content Editor pane. Enter keywords here to search the site for relevant content, results will show all related items.
The Home Node displays all of the website content. Continue to use the arrows on the left of each node to navigate down to your pages.
Click any folder or item within the tree to select it. Once selected, your page will display in the main panel on the right-hand side. Clicking the down arrow will expand the item and reveal any sub-items. Clicking the arrow again will collapse the item. If you right-click on an item, this will display more options - these will differ depending on the item you have selected.

The Main Ribbon runs along the top of the page and is grouped into tabs, allowing you to quickly access the various content management functions.
Each tab contains a different group of commands. Each section is labelled at the bottom, giving an idea of the functions available. You can switch freely between tabs; this wont affect the content you are working on.
Depending on your assigned role within Sitecore, you will be able to see different tabs and subsequent functions. Functions which are not available will be greyed out.
Below is an explanation of some of the more commonly used tabs:
Home
These functions allow you to save, copy, move,
duplicate, delete, rename or reorganise items within the content tree of the
site.
Navigate
The items within this tab allow you to select,
open, move, and view favourites and links.
Review
The Review tab is used to publish any changes that you have made. It is also useful for checking all of your
locked items using the My Items button. You can also use this tab for spell
checking.
Publish
Use this tab to navigate to the Experience Editor, use the Change functionality to unpublish pages, as well as Preview
any changes you have made to the page and how they'd look on the live site.
My Toolbar
You can create your own toolbar with a custom set
of functions that you use most frequently.
This toolbar is located to the left of the Content Editor Tree, separated by a thin grey line. When you right click the toolbar, you will see various options that you can choose to display, e.g your locked items. The items here are all hidden by default. You can see more information if you hover over the item.
Locking a Page
Each section within the main window can be collapsed either by clicking the section title bar, or the down arrow. However, this panel is greyed out and unable to use until you lock the page
You should see a yellow bar at the top of this panel that prompts you to 'Lock and edit' the page.
Selecting this option means other users cannot access the item whilst you are making changes to it. This is to ensure that pages aren’t overwritten by another user.
Unlocking a Page
You will automatically be prompted to lock an existing page before use, but will not receive a prompt to unlock the page before you leave. Once you have finished working on a page, it is important that you unlock it so that other users can edit the content.
To do this, navigate to the ‘Review’ tab and select ‘My Items’. From here, you can unlock the pages that you have finished working on.
Using the Rich Text Editor
There are a number of icons within the Rich Text Editor, some of which you may recognise, as they are used within various programmes such as Word and Excel.
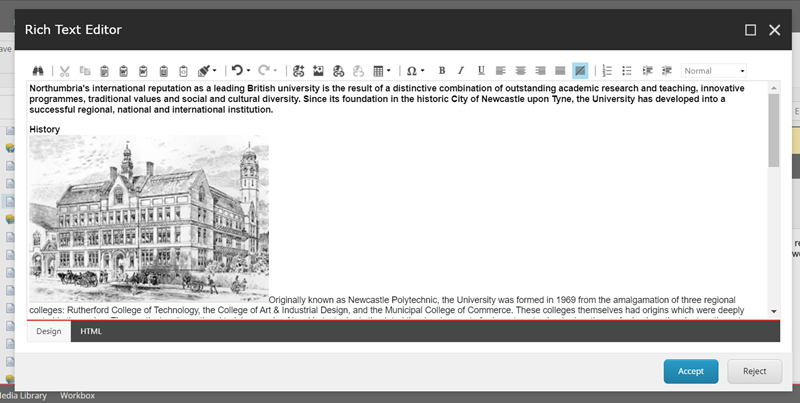
Opening the Rich Text Editor
To edit the main page content you need to navigate to the Content tab and click on Show Editor. This opens the Rich Text Editor where you can edit the page content.
Insert Sitecore Link
The Insert Sitecore Link button allows users to link to a web page or document within the Sitecore CMS. Once you have clicked the icon, navigate to the page or document you wish to link to.
This ensures that the hyperlink references the unique Sitecore ID for that page and means that if the page or document is ever moved in the site tree or media library, the link will not break.
Insert Sitecore Media
This is used to insert an image from the media library into the body of the page.
Once clicked, navigate to the images folder to find the desired image, select it and click insert.
Once inserted onto the page if the image is too big, right-click on the image and select 'properties' to manually adjust the pixel value.
Hyperlink Manager
This is used to link to external websites. To do this, type or paste the website URL into the URL field and add the link text. For example, www.ucas.com and UCAS Homepage.
You should also set the target to ‘New Window’. This opens the web-page in a new browser window, so it is not taking the user away from the university website.
Remove Link
You can remove any link by selecting the text and using the Remove Link button as seen below.
Another way to do this is by right clicking on the link and selecting Remove Link.

Format Stripper
When pasting text from another web page or document, it is recommended that you paste into notepad first to strip out any text formatting. However, you can also use the format stripper within Sitecore.
Paragraph Styling
Because of the brand style and usability best practice, Sitecore users do not have any control of the font, font colour and image alignment but they do have some paragraph format styles to choose from. This enables the user to format text, there are 4 styles, one of which is a blockquote.
The Title Field
It goes without saying that every webpage should have a Title. Headings help readers understand what the page entails. This field should always be filled in.
Filling in the Description field offers the reader a brief summary of the page and sits just below the page title when it is live. This field is not mandatory.

Hero Banner Image
If you are creating a new page, you should always make sure the Hero Banner field is populated, as without it the page is left with a grey band in its place.
You can add or update the Hero banner image by selecting browse. This takes you to The Media Library where you can select an image.
It is important to note that this image should be resized to the right dimensions before it is placed in the media library.
(You can find information on image sizes and guidelines within the Media Library section of the Sitecore Support Hub).
Navigation Title Field
The Navigation Title appears in the right-hand navigation menu and in the top navigation of the website. It makes sense to keep this page name the same as the Page Title.
However, it can be a useful way to edit down long titles so they display better in menus and don't run onto two lines.
SEO Title
HTML Page title – or the SEO title field in Sitecore.
This is important as:
- It appears in the browser tab
- It is the title that appears in Search Engine results such as Google or Bing.
- It’s the first thing a screen reader speaks when a page is loaded
- This should be unique
- It is best practice to follow the format of Page Name | Site Name so if we were editing the History of Northumbria page, we might want to edit this field to read: History of Northumbria | Northumbria University

SEO: Meta description and Meta keywords
The Meta description field should be used to briefly describe the page using the same keywords as the SEO title.
You can also use the Meta keywords section to list any keywords you think web users might use to find your page in Search Engines. The keywords should be separated in this field using commas.
Publishing
In the Content Editor, you can publish your page to ensure a new page, or any page updates are visible on the website.
To publish a page, navigate to the Review tab and click on the small green arrow with the instruction Submit for publish. This will put your information in a publishing queue that will go live roughly on the hour (depending on the number of changes in the queue).
You will be prompted to Enter a comment when submitting for publish. It is recommended to leave a short comment stating what changes you are making. This helps to keep track of any changes previously made to the page.
Please check the page on the front end to ensure your page has been published correctly. For this reason, it is best practice to use the preview function before you Submit for publish to avoid mistakes being made live.

Unpublishing a page
If you have created a page that no longer needs to be live on the corporate website you can unpublish it.
To do this you need to:
- Make sure you are in the Publish tab in the Main Ribbon
- Select the Change button
- Navigate to the Items tab in Publishing Settings
- Untick the Publishable box
You should see a small globe icon with a cross appear next to the left of the page in the site tree.
To make the page is actually removed from the website, you must then make sure to:
- Select Save
-
Select the Submit for publish button (this may seem counter-intuitive but in this instance, Submit for publish is the final step to unpublish the page)

New Publishing Validation
We introduced some new validation to the publishing workflow.
The new validation rules have been implemented in Sitecore by means of mandatory fields, which will prevent you publishing if you do not populate them.
1. Page Title, Meta Description and Meta Keywords in the SEO section
This ensures your pages are returned higher up the search listings in Google.
2. Search Keywords field
This ensures your pages are returned higher up the search listings when searching the corporate website.
3. All Open Graph fields
This is the content that shows when you share a page on social media. i.e. Facebook.
4. The main Content field
This is to ensure all pages have some body text on the page.
Please note – if you do currently have a live page without any body content, you will need to add some before you can publish the page again.
An example of this would be a page containing only rows of pods. In this case, intro text would need to be added.
If you have any further questions or would like advice on populating the fields mentioned, you can contact the Digital Team at bc.digital.marketing@northumbria.ac.uk.
Saving
In the Content Editor, you can save your page at any time by clicking on the Save icon which is always at the top left of any menu. This saves any work, but does not show the changes on the website.

Previewing
In the Content Editor, you can preview how your page will look once live, by clicking on the Publish tab and then clicking on the Preview icon. This opens the page in a new browser window and shows a preview of what the page will look like once live. In this view, you can check for spelling mistakes and also review links.
Adding a New Page
To add a new page in the Content Editor simply right-click on the page you would like it to be placed under in the site tree, select Insert, and then click Standard Page.
As you can see from the below clip, you can also add a range of other page types and page components such as an Accordion Items Folder or Mixed Pod folders.
Deleting a Page
An unpublished page will still show in the site tree. If you would like to remove it from the site tree, you can choose to delete it. To do this, right-click on the page and select Delete from the dropdown.
This will move the page to the Recycle Bin. Navigating to the Recycle Bin from the main dashboard and selecting Restore will reverse this action.
To delete an item within Sitecore, navigate to the item and right click, then select delete.
You can also use the delete icon within the ribbon.
Moving and Copying Items
You can move and copy items within Sitecore.
To move an item, navigate to it within the site tree and select it. Right click and select copying, then move to. Within the pop up window, navigate the site tree and select the new location. Click move to confirm. The children of the item you are moving will also re-locate.
To copy an item, again navigate to it within the site tree and select it. Right click and select copying, then copy to. Within the pop up window, navigate the site tree and select the new location. Click copy to confirm. The children of the item you are moving will also re-locate.
Moving
Copying
While Sitecore intermittently asks you to save your work, it also creates new versions of the page. This is a helpful way to ensure previous work is not lost.
Users can choose to select previous versions of a page, publishing an older version can “roll back” changes rather than creating new ones. This should be used sparingly.
Please note that Sitecore only stores the last 5 versions of a page.
You may see a warning message about versions in the top yellow bar when you go to publish, this is usually to warn that there are changes already in the publishing queue, that will be published prior to further changes.
If you delete an item, it will be stored within the recycle bin. The name, original location and date the item was deleted will be displayed within the recycle bin. You can restore an item to its original location if it still exists within the recycle bin, just select the item and click restore from the ribbon at the top of the page.
To open the recycle bin, select the icon from the Launchpad, or from the home tab within the Ribbon.
