Taking photos is something we all love to do, to some degree. Since the introduction of social media, we all love to share our lives through our photos. It was be such a great way to keep great memories alive, and share your experiences as a student with friends and family back home. If photography is something you're interested in, take a look at my tips for newbie photographers, and learn how to take your photos to the next level!
Get off ‘automatic mode’
Over the years, I have transitioned from using Automatic mode, to Program mode, to Shutter Priority mode and occasionally, Manual mode on the camera.
The first step to learning about your camera however, is to set the dial to a different mode. One of the many issues with Automatic mode is that the camera’s flash usually pops up when the camera does not detect enough light which then captures an image with harsh, unnatural lighting. Try different modes instead! For example, Shutter Priority allows you to control the shutter speed of the camera. Aperture Priority enables you to control the depth of field and the exposure.
This progression has allowed me to learn about how specific settings such as the exposure, ISO and aperture which would affect the outcome of the image in its own respect. Moreover, after mastering these modes, you are in full control of how you want to capture a specific moment without having the camera to make the choices for you.
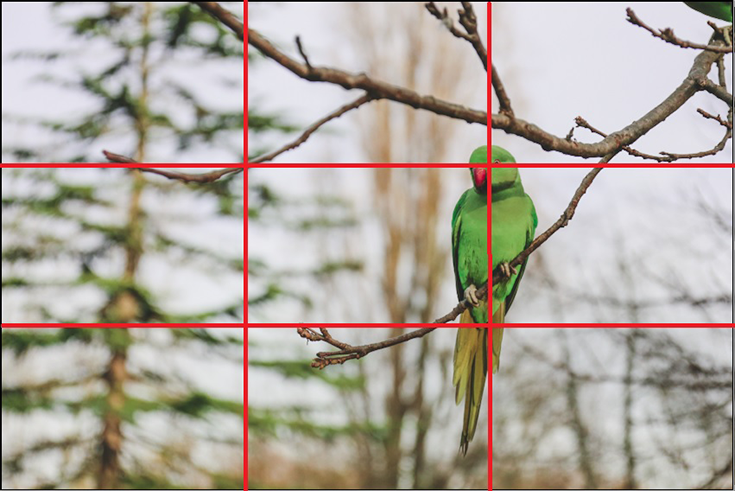
Basic Composition Techniques
This rule of thirds is a general safe, simple rule to follow to create aesthetically pleasing photos. When the subject of a photo is placed at the correct position, this will naturally look more interesting and pleasing to the eye. When composing your shot, imagine 2 horizontal lines going across 2 other vertical lines, creating nine even boxes. Placing a subject on the intersecting points of these lines will often yield satisfying results.
Alternatively, having natural lines in the shot help create symmetry in the image which would result in an aesthetically pleasing shot. Additionally, these lines give depth and perspective to an image.
The types of shots listed here are by no means comprehensive. I mean, I have only listed two. But I beckon you to go find out more composition techniques! Note that these composition techniques are not set in stone. Familiarise yourself with them and mix it up with your own style.
Selective framing
Be selective with your shots. Capturing a photograph is like telling a story. Use certain foreground and background elements to frame a picture and let the viewer recognise the narrative you are trying to express. After capturing a moment, this can also be corrected when post-processing your image through cropping. Furthermore, framing your subject with suitable elements give focus to the main subject in a photo.
Vertical and horizontal shots
There’s a shot for every occasion. It is up to you to decide what works and what doesn’t. The general rule would be that if the subject is wider than it is tall, a horizontal image is a better fit for the occasion. A horizontal image conveys a sense of vastness in landscapes or to suggest horizontal motion occurring in an image.
Alternatively, if your subject is tall, a vertical image compliments the subject. Portraits of people work really well in a vertical image because it focuses attention onto the subject by removing almost all sense of peripheral vision.
Eyes
‘Eyes are the window to a person’s soul’ is a common saying and is very applicable in photography. Having direct eye contact with the subject creates a connection between the viewer and the picture itself. This is a simple but very effective way of telling a good story through a photograph. Considering the expression of the subject in the image, the nature of this relationship can be expressed to the viewer.
Straighten your image
You should always straighten shots by looking through the viewfinder and follow the grid laid out in the camera if there is one. However, even if you are not able to manually obtain a straightened image, simply straighten your image in a post-production software. This is a simple trick to ensure your photographs have a professional touch to it.

Lighting
In the realm of photography, lighting plays a crucial role. Before shooting, consider your environment and make the best out of it. Say you’re in a room with natural light from the windows. Place your subject in front of these windows for bright and clear shots.
Here’s another tip on lighting, in-built camera flash almost always does not work. The flash does not work effectively in dark places as it creates a flat image of the subject. Alternatively, you could get an external flash which will greatly improve the image quality of the individual. Another option would be to rely on the surrounding lighting to immerse the subject in the environment.
Golden hour
Harsh afternoon lighting can produce photos that are difficult to edit when it comes to post-processing. Instead, aim to shoot around sunrise or sunset when your subject has direct but softer light falling on it to get a warm light that is perfect for natural lighting. Before you go out to shoot, plan what and where you’re going to shoot because timing is crucial for photoshoots that go on during golden hour. Don’t forget, the dramatic skies and great lighting are also ingredients to a beautiful silhouette shot!
Creativity over gear
The easiest excuse to give yourself is not having a good enough camera or photography equipment. However, in this day and age, that shouldn’t be the case. Even camera phones are getting better at taking high quality images. The first step is to familiarise yourself with the current gear that you have and make the most out of it with the knowledge of its potential and limitations. After all, the best camera that you have is the one you have with you.

Candid
A candid picture tells an honest moment – one of which can be hard to capture when behind a camera because these moments catch us by surprise. Candid photography is when the subject does not need to pose in front of a camera, but rather, captures the subject displaying an effortless emotion that is conveyed out of the true essence of a certain moment. Always have your cameras out and ready for this moment.
Find your niche
Photography comes in many forms. Some of which requires very specific methods to be used in order to yield results. Astro photography for example, utilises the long shutter mode to capture these shots. Find your niche, whether it would be overhead shots of food, portraits of dogs, minimalist photography or any other style that captivates you. From that point, take hundreds of the same picture style; nay – make it thousands.
Take more photos
Just like every other skill, photography requires a lot of practice. This tip seems rather obvious, but you’d be surprised how many shots a professional photographer takes just for a single good photo. Doing this doesn’t make you a bad photographer, but a diligent one. Increasing the volume helps you to recognise specific framing that would work well for different scenarios. Just remember to clear up memory space on your SD card or phone when you’re done!